Presidents Message
Fellow Members
BAWA Q&A
One of the advantages of BAWA is that it gives members the opportunity to discuss their projects and seek advice from other members. Until now this has been at the meetings or by individual email exchanges. Several members had been asking if we can add a Q&A section to our website, so I am pleased to let you know that Ask BAWA is available and I encourage you to give it a trial. To use it go to the Q&A section of the website, ask a question and submit it. You can also go to the website look at the submitted questions and submit a reply or comment. For safety reasons your questions and replies do not appear on the website automatically. They are sent to the administrator (currently me) who uploads them. In woodworking, as in life, there is often no one correct answer so there can be many replies to a question and all will be uploaded. At the moment we are limiting questions and replies to those from members only even though anyone in the great wide world will be able to see them. This is a work in progress. Hopefully as the questions and replies build up it will become another useful resource for members.
I welcome any comments and suggestions from you as how to change and improve the system.
Finishing
At the April meeting we had an excellent presentation by Ted Fay on finishing techniques and this was followed up by a Saturday full day hands-on course in May. Finishing is a very complex topic that many of us have problems with so we are trying to arrange for another presenter to talk on some other aspects of finishing sometime later this year. I think the reason why many of us have difficulty in finishing is that we are engineers, or at least our brains are wired to be engineering like. Joints, precision dimensions, 3D structures, machines, sharpening - they are all engineering type constructs. On the other hand finishing is chemistry and the physics of optics. On the surface (no pun intended) it is stains and varnishes, but below this simplistic view it is all chemistry and chemical reactions: how different chemicals interact with each other to produce the finish, to dry, to stay workable just long enough to flow correctly, to give the desired hardness, etc. while at the same time give the desired depth of color and sheen, etc. With the troubles I have in this area I may need a brain rewire to make it intuitive. But as woodworkers it is part of the knowledge we need to learn.
Enjoy your woodworking - and finishing.
Frank R Ramsay
President
frankramsay8@aol.com
Frank Ramsay, BAWA's president, called the meeting to order with a loud bang of the gavel at 7:00 pm and called for announcements:
Announcements:
Per Madsen said that we have 11 people signed up for the Finishing Class with Ted Fay. It is being held in Ted's shop on Saturday, May 20, beginning at 9:00am.
The June 16 meeting will feature Harold Patterson who will talk about routers, router jigs and techniques.
In July, Mike Bray will talk about riving a log to make boards to be used in a cabinet.
We need to recruit a speaker for the August meeting and members are invited to volunteer.
Jamie Buxton announced the annual 2 x 4 Contest will be held in July. Members are encouraged to look for that perfect quarter sawn 2 x 4 from Home Depot. Even the kiln dried ones have 14% water content, so it's a good idea to buy one soon to finish drying in your shop, unless you can bring it into the house. The only rule is to use one 2 x 4 to make the project.
Frank Ramsay described the "Rebuilding Together" projects that were completed in late April. One BAWA group made a deck platform, the other made, then painted some benches and tables. Some members had seen the effort reported on the evening news.
Fred Reicher cleaned out his liquor cabinet and donated some bottles to the club. One bottle will go to door prizes each month. Fred has also been very successful in getting our meetings announced in the local newspapers.
Stan Booker purchased six beautiful cherry boards for the next raffle. Buy your tickets.
Frank Ramsay has been busy improving the web site again. Starting soon, members and even the public can pose a woodworking question to the site. A moderator (Frank for now) will review the questions; he will then refer it to the appropriate expert for a reply.
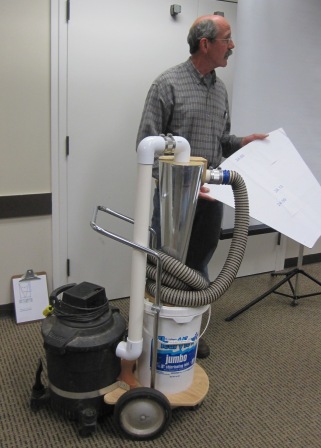
Show and Tell time: Home designed cyclone dust collector
Brian Newell
A furniture maker based in Fort Bragg
Claude Godcharles, who had suggested we ask Brian Newell to present at our meeting, introduced him.
Brian attended the College of the Redwoods in 1989-1990 and studied under James Krenov. He found the Krenovian cabinet design taught by the school to be too confining and longed to use curved surfaces in his work. So after graduating, he went to Japan to learn and work for a couple of years that turned into 10 years. While there, he married, had a daughter and became the mascot of Japanese lumberyards. But, more on that later. We let Brian tell the story.
Brian introduced his furniture with a preface saying he is never sure what a piece will be used for, or whether it will be functional. It will be beautiful, it will have compound curved panels joined with floating splines, incorporate wood carving and be made of exquisite wood. He is not sure he would ever have any of his furniture in his own house.
The first photograph was of a display cabinet with curved surfaces made of pear wood with faceted glass panels. He explained that he wastes a lot of wood with curved panels, but has found the scraps are useful to heat his shop. Now, however, he has taken to giving the offcuts to the students at the College of the Redwoods.
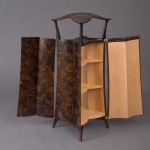
The second photograph was of an English sycamore demi-lune hall table made with curved legs and holly carvings. Another cabinet was made of pear wood and cocobolo with coopered doors.
Many of his works cannot be pushed against the wall because their irregular shape invites the observer to walk around the piece. American homes with large entry halls become excellent venues for this work. Japanese homes, however, are smaller and demand more diminutive pieces. Nevertheless, walk around pieces are well suited for a small, demanding market.
He made a cabinet of sycamore and hornbeam with a footprint of a broad disc with a larger, round center. Imagine a pregnant flying saucer shape . It too, contained his central design elements: compound curved, laminated panels, elaborate carvings, and walk-around design.
When starting a piece he usually does a loose sketch just to get the proportions right. He claims not to be an artist and has found that detailed drawings are too confining. The wood wants to talk to him, change its shape and character during construction. So he lets the wood decide on the details.
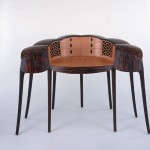
He showed us a photograph of a satinwood box with carved panels that seemed to float between the legs, unattached. The trick was to overlap the leaf-like sides over the leg, then attach them at the back of the leg with splines. The effect was to create a gap at the front between the leg and side.
He showed a photograph of a hickory walk-around cabinet, in the shape of the pregnant flying saucer with six legs. The curved panels were compounded, narrower at the top, broad at the bottom. How do you attach hinges to curved panel doors? If the two hinges on a door are not in the same plane, the door will not open. Brian explained that you have to pick two points on the door that are nearly in the same plane, not necessarily at the top and bottom of the door. It is tricky and dangerous, however. The hinges are the last element you add to the cabinet. It is finished, yet the most dangerous part is locating and installing the hinges. Yes, he has worried about wrecking a piece at the last moment, but he has been careful and it has not happened yet.
When making his curved panels, he makes his own basswood veneer - 25 layers, most have compound curves made with a vacuum press. He laminates the final wood layer over the basswood panel. The panels are joined with floating splines. When making curved legs, he shapes the wood on a bandsaw with a ½in blade, using the back edge of the blade as a guide. The legs are not exactly the same. If they were the same, it would take the life out of the wood and the piece. Let the imperfections add life, he extolled.
His most elaborate piece is a desk with 9 legs. Yes, it too has compound curved panels joined with floating splines, curved legs. The panels are covered with scales of wood, resembling the skin of a fish, but offering textures in wood grain. It took Brian 5 months working 50 hours per week to complete this piece.
When living in Japan for 10 years, Brian found that wood is sold differently than in the United States. Pieces of wood are large flitches, at least 3 to 6 inches thick. There is no 4/4, 5/4, 6/4 etc. Prices vary by the quality of the wood and the dealer holding the stock. Brian became obsessed with the wonderful wood he found. He toured all the local lumber dealers, becoming their mascot customer. He even returned to the United States with a full contained of the treasure he had found. Brian's dream is to host tours of the Japanese lumberyards for American woodworkers. There will be a sign up sheet at the next BAWA meeting. He recommends buying an Isuzu with a crane mounted on the flatbed. They are everywhere in Japan.
He made a wooden shrine for a deceased friend while in Japan. There are rules for Buddhist shrines, a fact not known to him until a Buddhist priest examined the piece and explained the rules. He got a list of his mistakes. Maybe the next shrine time .
What is the market like for his work? He sells much of his work through galleries, mostly in New York. They take 50%. He makes better than $2 per hour. It is a small market with crazy collectors, some are rich, others just like to collect. They buy because they love it, love the furniture, and accept the instant depreciation.
Brian brought in and passed around a Japanese cypress box incorporating his signature style and techniques: graduated, compound curved panels, actually small veneer tiles, joined with floating splines. Small rectangular tiles on top, each row getting larger towards the bottom. Each tile has a curved convex surface. Each tile is high in the middle, sloping down towards the edges. He bevels the edges of each tile on the table saw, joining them with splines. Because of the convex curvature, the joint between each tile seems wider in the middle, narrower at the corners. The joint is the same width in fact, the illusion is optical, because the joint is higher, not wider in the middle.
And we all marveled at the intricacy of it all. But it is doable. Claude took Brian's course for five days and showed us the piece he had made: compound curves on a panel, scales for a veneer. Ok, so it takes some practice.
Great presentation, wonderful sense of humor.
9 Legged Desk
Dinosaur Cabinet
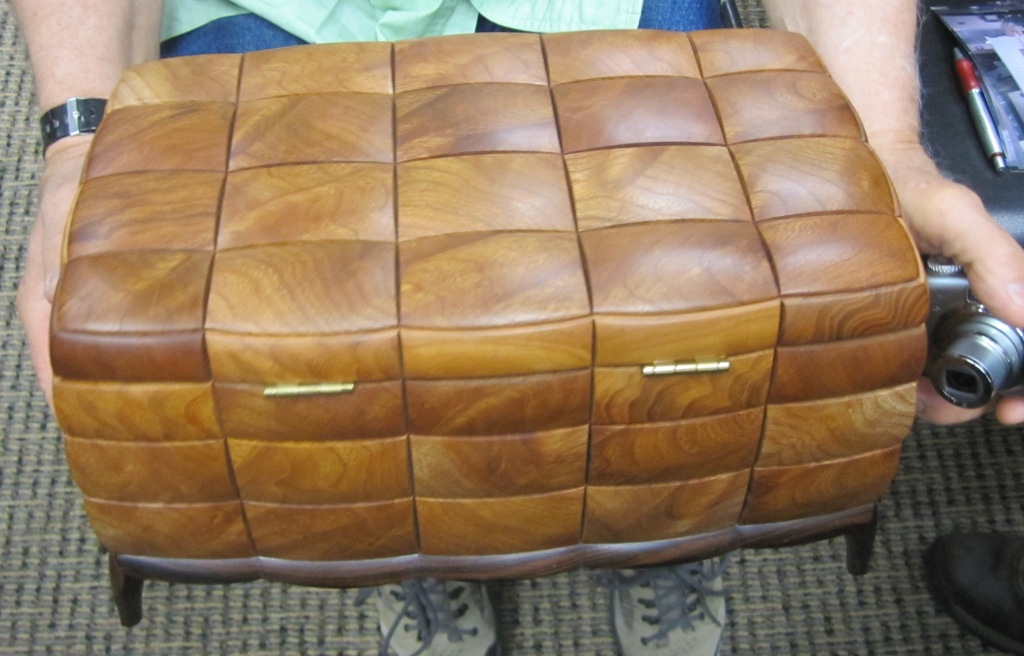
Cypress box Brian brought to the meeting
For more pictures of Brian's work and information about him you can go to his website: briannewellfurniture.com
John Blackmore
Finishing Seminar with Ted Fay May 21, 2011
Ted has a large shop in the Bayview district of San Francisco. It is a metal shed structure about 80 feet long, 30 feet wide with a high 30-foot ceiling, only lacking a large overhead crane to complete the industrial look. Ted had prepared well for the seminar, cutting plywood and solid wood blanks for us to test finish. Per Madsen and Frank Ramsey brought the croissants and coffee. Ted introduced Greg Smith the owner of City Paints in San Francisco, who brought samples of the products we would be using in the seminar.
Ted began with a description of difference between lacquers that cure by evaporation and varnishes that polymerize. The layers of lacquer integrate and create a chemical bond. Varnishes, on the other hand, cure with polymerization of the chemicals. The layers dry separately and have a mechanical or electrostatic bond.
It is important to understand how thinners work, Ted explained. Alcohol residue, for instance, can poison a polyurethane finish, created a clouded appearance. If you surface treat wood with alcohol, give it at least one day to fully evaporate. Solvents, as described in the Products List below can be ranked from cold to hot. Hot solvents, such as lacquer thinner can be used as a wood stripper, removing old finish. Use colder finishes with or over hotter solvents and not the other way round.
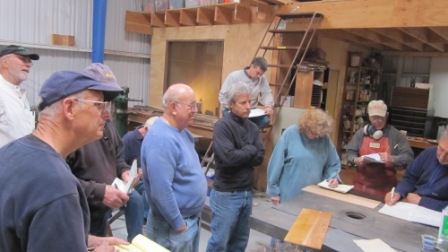
The students
Ted buys many of his products from either City Paints (Mohawk) or Jamestown Distributors (Interlux). See the list below. All are better than those found in the big box stores. He hates water based finishes because they leave the wood with a bluish caste. He uses horsehair or badger brushes, often costing $60 or more. His favorite finishes are shellac, varnish, and oil. He does a lot of French Polish finishes. He does use some resin/oil mixture products and has found that high resin content requires more technique. Oil finishes are easily applied with a wipe-on technique and have better wood penetration.
When preparing raw wood, Ted will always sand to 220, wash with alcohol to reveal any sanding imperfections, sand again, wait for the alcohol to fully evaporate, then stain, if required, before sealing. A second sealing coat is usually applied. The wood blanks prepared for the class were sealed with two coats of the Mohawk Sanding Sealer.
Sanding is done with a sanding block made of MDF with a cork pad, using 220-grit sandpaper. The cork is joined to the MDF with contact cement. He feather sands around the edges first, then sands with the grain over the full length of the wood. Then he seals the wood and repeats the sanding process. Before apply the final finish coats, he wipes the wood of dust with naphtha and then a tack cloth. He builds up at least two coats of a gloss finish since it has a higher solids content.
When using a spray lacquer, such as the Mohawk Tone Finish Clear, he sprays just shy of really wet with a 50% overlay between strokes. He sprays very slowly.
With a brushing varnish on raw wood, such as Epifanes, he thins the first application to 50% with Interlux 333, a proprietary paint thinner. The second coat is kept just thin enough to spread with a brush and can be applied before the first coat is dry. His technique is to thin the second and subsequent coats 15%, then pour a thin line midway across the board. Then he lands his brush like a plane in the pool and draws it toward the end of the board. If necessary he will brush across the grain to fill pores, then perform a with-the-grain final brushing. He cautioned us to not put the brush in the can of varnish. It is better to pour the varnish onto the surface of the wood or into a separate small cup, thereby avoiding contamination of the varnish in the can.
If he uses Epifanes Spar Varnish, which is very thick, he will wet sand it with mineral oil after it has dried. Varnished pieces are set to dry at a slight angle in order to facilitate venting off of the solvent in the finish.
French Polishing with shellac is a timeless finish, but should not be used on surfaces that will be exposed to water moisture or alcohol. Shellac is alcohol based and water will cause a frost like haze to form. Ted creates a barrier coat on raw wood with a 2 to 3 pound cut of shellac. For our class, he created the barrier coat with Sanding Sealer. He demonstrated "faux" French Polishing that uses either Rapid Pad or Lacover as the varnish coat over the barrier coat. Rapid Pad is used for large surfaces, Lacover for smaller pieces and spot repair. To make the polishing pad, he folds cotton without wrinkles to make the core, then envelopes it in either linen or cheesecloth. He prefers linen because of its finer texture. He loads the pad with the varnish or shellac, then charges it by hitting the pad against his gloved hand palm. This action brings the varnish to the surface of the pad. Then using a touch-and-go technique, he moves the pad from center to edge, following the grain. When properly done, you may be able to see a smoke like vapor leaving the surface of the piece. It is the solvent evaporating. He uses Mohawk Wool Lube or mineral oil to lubricate the pad and facilitate application. The traditional lube is tung oil, but Ted prefers the alternatives. This is squirted on the pad from time to time if the pad no longer glides over the surface well. The students were able to try out these techniques following Ted's demonstration.
As a final summation, Ted outlined the steps to lacquer and varnish finishes:
Assume you are finishing a raw wood walnut coffee table.
Lacquer Varnish
Apply with a brush, dip in can
Deft, Brushlaq
Barrier or Piss Coat
25/75 lacquer/thinner
Grain filler
Sand 280/320
Fog coat spray lacquer
Apply 2-3 coats of lacquer
Dry or wet sand with naphtha
Brush on final coat at full strength
Varnish
Apply with a brush, pour onto piece
Epifanes
Barrier or Piss Coat
25/75 varnish/thinner
Grain filler
Sand 280/320
Fog coat spray varnish
Apply 2-3 coats of varnish
Rest 2 to 3 days
Wet sand, same solvent as varnish
Brush on final coat at full strength, but may thin 10-15% if required.
As an example at the end of the class, Ted demonstrated his refinishing technique by restoring the tabletop Frank Ramsay had been struggling with for several weeks. It had been repeatedly sanded and finished but continued to be blotchy. Ted performed his magic and now Frank has a perfectly applied faux French Polish finish. We were all inspired. And we had been taken to have lunch at a wonderful Mexican restaurant in the neighborhood. Thanks to Ted for a most informative and instructional seminar.
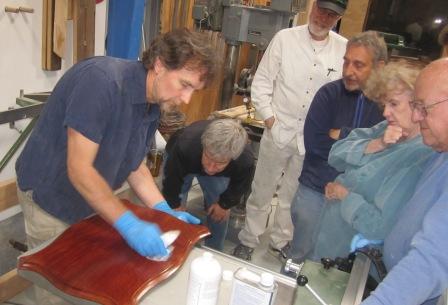
Five minutes to fix 6 months worth of problems
Products List:
Mohawk Finishing Products: mohawk-finishing.com
Aerosols Tone Finish Clears - an aerosol lacquer, nitrocellulose based, used as a topcoat.
Tone Finish Clear Lacquer Sanding Sealer - fills in and levels surface, seals in stains before final topcoat
Rapid Pad Padding Finish - repairs scratches in a French Polish finish, padded on.
Lacover 50 Padding Finish - French Polish padding finish, most widely used in the world. Instructions for applying the Lacover finish with a pad are described on page 28 of the Mohawk Finishing Products booklet.
Sanding Sealer
Wool Lube Rubbing Lubricant - used on the French Polish pad to lubricate and smooth the surface.
Jamestown Distributors: jamestowndistributors.com
Interlux Brushing Liquid 333 - slow drying solvent for use with varnishes
Interlux Schooner Varnish - high gloss and excellent water resistance
Epifanes Wood Finish Gloss Varnish - phenolic based resins, tung oil
Lacquer Thinner - acetone based, used to thin lacquers and varnishes
WM&P Naphtha - fast drying paint and varnish thinner
Deft Clear Wood Finish - nitrocellulose brushing lacquer
Woodkote BrushLaq 680 - nitrocellulose brushing lacquer
Penofin Blue Label - rosewood oil, best bought in Nevada. penofin.com
Good Stuff - a food safe wood oil
Solvents - cold to hot
Water, alcohol, mineral spirits, turpentine, naphtha, acetone, lacquer thinner
City Paints
John Blackmore
Rebuilding Together 2011 Report
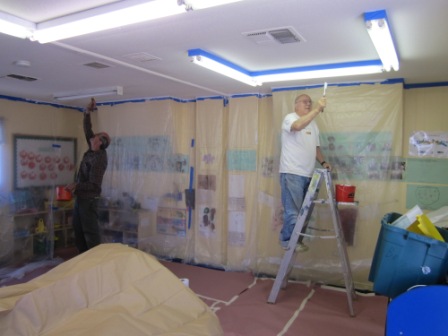
The painting crew
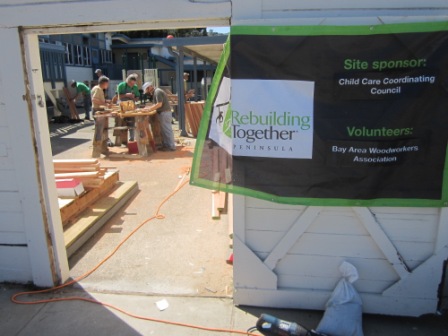
The production line

Some of the finished tables
About 2 dozen BAWA folks staffed two sites on two days to help Rebuilding Together Peninsula work on 67 sites this year with roughly 3,000 volunteers. TWO sites! That's pretty good for a volunteer woodworking club! Daycare was the theme on both sites: one single family residence hoping to be re-certified as a family daycare and a large non-profit institution situated in a former WWII Navy building. We removed a rotting deck, fixed significant amounts of fencing including a new gate, installed some doors for storage, some trim work around a heater and water-heater and then made a major repair to the wall at the former Navy building, built a free-standing redwood deck as a 'stage' for the kids, painted a ceiling in an entire building and finally with Frank Taylor constructed six redwood picnic benches for several age groups at the Bayshore Childcare facility. BAWA again put together some talented workers who with their tools and about $4,000 worth of materials at the two sites did a great job to help the less fortunate have a better physical setting. Seven volunteers were also recruited from California Water Service Company by Jay to help mostly at the single family site, but Jan Kooy was involved with the deck on the 23rd at Bayshore. Thank you all and hope you got something out of a tiring day. Now, next year....
Jay Perrine